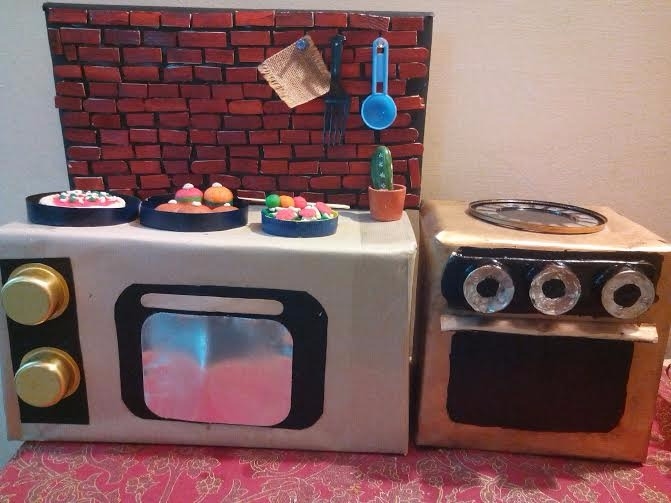
Your child loves to be in the kitchen? Set up this DIY Miniature Kitchen!
14 Apr 2016 | 3 min Read
Sudha Chegudi
Author | 1 Articles
My pre-schooler son came home with a school project, which required us to upcycle and reuse the best out of waste. The key to any art is to capture the idea, visualize in your heart and see it through one’s mind!
So this idea of creating a mini home kitchen struck us!
Here’s a run through on what we managed to make and received appreciation too 🙂
Materials Required:
Empty Shoe boxes, ice cream sticks, sheets of paper, play dough, tea light candle holder, broken bottle lids…. Loads of creativity and patience!
Step-by-step know how:
The kitchen counter:
1. We wrapped the shoe box in the required color sheet and cut out black strips for the back ground for the knobs.
2. The tea light candle holder goes in as the knob as shown in the picture.
3. An aluminum box cover served to give the oven a window (Equivalent to the glass window in a microwave oven).
4. The counter was an inspiration drawn from a bricked wall. We cut ice cream sticks to small bits to replicate the same. We then painted them in shades of brown to give it a brick effect and allowed it to dry.
5. We hung broken and mini spoons on the counter with board pins.
6. Cactus on the counter had to be the highlight! Found a discarded medicine bottle cap, wrapped it in clay and painted a Brown shade. We quickly found a pebble either round, long…and painted it for a cactus.
Cooking Range
The materials used are similar and had and extra plastic lid painted for the stove heat plate 🙂
It certainly was fun to make this and my pre-schooler enjoyed as much as I did putting this together.
Food
With regard to the clay food Miniature, it’s about using the right colors with play dough.
We used spoons as moulds to make the layered cookies and added a dash of white clay for the whipped cream effect. Using a fork, the textures were created.
We Grated some green colored clay for the salad and created colored oval shape tiny clay balls and inserted them in a tooth pick as a skewers.
As for the Pizza, it was the sheer use of colours to bring in that effect and of course, the fork to create the textures.
Some of the ways I got my child to help me through this was – gluing each piece, ideas for the Miniature food, painting the brick wall and engaging in a conversation all through to make it interactive. The cactus on the counter was my child’s idea 🙂
With the summer break setting in, such DIY activities are a great way to engage yourself with the little humans at home! Happy crafting and most importantly, create many happy memories 🙂
All pictures in this article are original and belong to the author. Reproducing them in any form without the permission of the author will not be allowed.
A


Related Topics for you
Suggestions offered by doctors on BabyChakra are of advisory nature i.e., for educational and informational purposes only. Content posted on, created for, or compiled by BabyChakra is not intended or designed to replace your doctor's independent judgment about any symptom, condition, or the appropriateness or risks of a procedure or treatment for a given person.
